WiFi Adapter Not Showing in Device Manager (Windows 10/11 Fix)
Did you check if other devices can connect to the same hotspot?

Is your WiFi adapter not showing in Device Manager? This issue can block your PC from detecting wireless networks entirely. Here’s how to fix it quickly.
Table of contents
- How to fix Wi-Fi adapter not showing in Windows
- 1. Use the Internet Connections troubleshooter
- 2. Update the network drivers (Internet needed)
- 3. Reset the network adapters
- 4. Perform a registry tweak with Command Prompt
- 5. Change the adapter settings
- 6. Reinstall the network adapter
- 7. Reset your router
- 8. Update the router firmware
- 9. Switch to the Maximum Performance mode
- Wrapping up
- FAQs
Why the WiFi Adapter Goes Missing
When your WiFi adapter is missing from Device Manager, it’s usually caused by:
- Disabled BIOS or UEFI wireless settings
- Corrupted or outdated network drivers
- Windows update conflicts
- Faulty hardware or a loose internal connection
Let’s fix it step-by-step.
How to fix Wi-Fi adapter not showing in Windows
 NOTE
NOTE
1. Use the Internet Connections troubleshooter
1. Press the Windows key + I to open Settings, then head to Updates & Security.

2. Select Troubleshoot from the left pane and click on Additional troubleshooters.

3. Select Internet Connections and click the Run the troubleshooter button.

di4. Follow further on-screen instructions and let the process finish.
5. Restart your computer.
When you’re encountering issues with your Wi-Fi adapter on your PC, a reliable option is the Internet Connections troubleshooter to identify and eliminate the source of the problem.
A problematic Wi-Fi adapter may also cause the Suspect ARP Probe Failed error. Read the highlighted guide for more information.
2. Update the network drivers (Internet needed)
- Right-click the Start button and select Device Manager.

- Click on the Network adapters section, locate the Wi-Fi adapter, right-click on it, and select Update driver.

- Now select Search automatically for drivers.
- If the system finds a new driver, it will be installed, and you will be prompted for a restart.
Updating the driver will work only if you have an Ethernet cable connection besides your Wi-Fi. If unavailable, download the necessary drivers on another computer or device and run the setup on the affected PC.
3. Reset the network adapters
NOTE
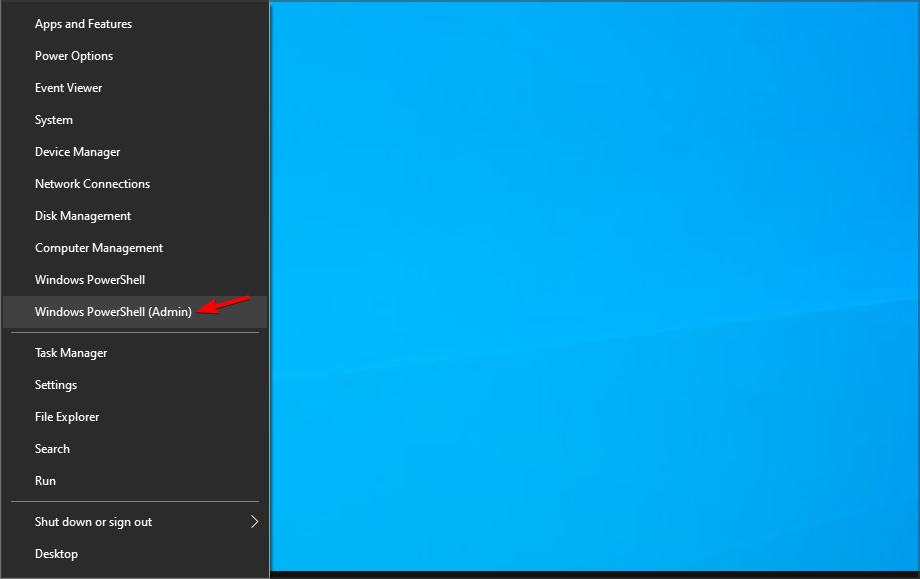
- Right-click on the Start button and choose Windows PowerShell (Admin).
- Type or paste the following lines into Windows Powershell and press Enter after each one:
netsh winsock resetnetsh int ip resetipconfig /releaseipconfig /renew
Once done, restart the computer and verify whether the Wi-Fi adapter is still not working
4. Perform a registry tweak with Command Prompt
- Type Command Prompt in the search bar and click on Run as administrator.

- Paste the following line and press Enter:
netcfg –s n
- This command will show a list of network protocols, drivers, and services. First, check if DNI_DNE is on the list; if it is, you have a problem.
- If DNI_DNE is listed, type the following commands and press Enter:
reg delete HKCR\CLSID{988248f3-a1ad-49bf-9170-676cbbc36ba3} /fnetcfg -v -u dni_dne
This should solve the issue, but if you receive the error 0x80004002 after entering the command, this value needs to be deleted slightly differently.
Here’s what to do if you receive this error code:
- First, go to Search, type regedit, and open the Registry Editor.

- Navigate to the following path:
Computer\HKEY_CLASSES_ROOT\CLSID\{988248f3-a1ad-49bf-9170-676cbbc36ba3}
- Delete DNI_DNE if it still exists.
5. Change the adapter settings
- Click on the Start button, type control panel, and then click on the relevant search result.

- Go to the top right corner and change the View by option to Large icons.

- Select Network and Sharing Center.

- Click on Change adapter settings.

- Right-click the wireless adapter and select Properties.

- Search for Internet Protocol Version 6 (TCP/IPv6), and uncheck the option to disable it.

- Click on OK and restart the computer to enforce the changes you made.
6. Reinstall the network adapter
- Right-click the Start button and choose Device Manager from the list.
- Click on the Network adapters section to expand it.
- Right-click your network adapter and select Uninstall device.

- Follow further on-screen instructions.
- Restart your computer, and Windows will automatically install the best available drivers for the device.
7. Reset your router
NOTE
- Look for the Reset button at the back of the device.

- Press and hold it for over 10 seconds until the SYS led starts flashing quickly, and release the button.
Resetting the router can do wonders, as cliche as it sounds. Though the steps to reset the router are different for each manufacturer, every router usually has a reset button. So, find the instructions for your manufacturer and finish the process.
8. Update the router firmware
NOTE
- Use an Ethernet cable to connect the router to your PC.
- Visit your router’s manufacturer’s website.
- Locate your model on the list.

- Download the latest firmware version for your model.

- Open your web browser and type the IP address or the router’s link (as an example, our router’s IP address is 192.168.0.1, but yours may be different).
- Now enter the username and password provided by the manufacturer (available in the manual or on the bottom of the device) or the ones you set.
- Navigate to the Firmware section and find the Choose file or Browse button to let you add the firmware you’ve downloaded.

- Wait for the process to finish, and do not interrupt it at any cost.
For more information, we suggest that you visit our guide on how to update your router firmware guide and avoid this and other like errors such as error code 10.
9. Switch to the Maximum Performance mode
- Press Windows key + S and enter power plan. Now click on Choose a power plan.

- Once the Power Options window opens, locate your current plan and click Change plan settings.

- Go to Change advanced power settings.

- Expand Wireless Adapter Settings, and set the Power Saving Mode to Maximum Performance.

- Click Apply and OK to save the changes.
Just keep in mind that the Maximum Performance mode will put some extra pressure on your device, so your laptop battery may drain more quicker. But, it should, in all likelihood, fix the problem with the Wi-Fi adapter.
Wrapping up
Once you have managed to fix things, find out how to boost the performance of a Windows PC for a better experience.
Many also reported that Ethernet works but not WiFi, so you might want to check our dedicated guide on that issue for more solutions.
We also have a guide explaining what to do if no WiFi networks are found, as well as a guide on There might be a problem with the driver for the WiFi adapter error, so don’t miss them.
Many also reported Network cable is not properly plugged or may be broken message, but we covered this issue in another guide.
You might also want to check out this guide on the “Wi-Fi action needed” error in Windows 10, especially if your connection seems active but won’t actually load anything.
If you have any comments, questions, or suggestions, let us know in the comments below.
FAQs
This usually happens due to hidden devices, BIOS-level deactivation, corrupt drivers, or physical hardware issues.
Yes. It can be disabled from BIOS, Device Manager, or via command line. Re-enable it to restore network functionality.
Use Device Manager, or run this in Command Prompt:
netsh wlan show interface.
Read our disclosure page to find out how can you help Windows Report sustain the editorial team. Read more


Improve this guide


User forum
11 messages